
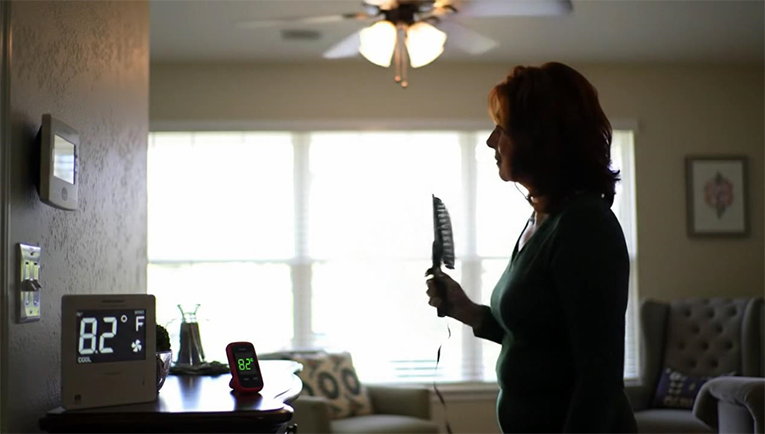
And, when either of those days, that hot, sticky day comes along and your house is too warm as your air conditioning system no longer does that which it is expected to and should, panic does not take very long to develop. However, jump the gun by calling in an emergency AC repair (that might cost you between 200 and 400 dollars just to show up before trying these 5 simple DIY tests) would make you fix in and perform almost nine out of ten of the common cooling start-ups that homeowners would face without resorting to the phone.
Reasons that should make your air conditioner stop working might be innumerable, with some being expected, and some so trivial as a soiled air filter, or longstanding electric issues.
It has been estimated that almost 90 percent of the U.S. homes are fitted with an AC unit and an annual number of 3 million HVAC units are serviced annually, half of which would fail otherwise and would have been diagnosed during these initial inspections and would have been fixed during the procedure.
Learning about Familiar AC Cooling Issues
The failures of AC security are patterned after easy learning. In addition, even in cases where the AC failures do take place, they are always in patterns that assist in the clarification of the problem and derive fixes that can be handled. Decades of industry repair data says that those are the four categories of cooling to most likely report:
AC Cool – By the Numbers:
- Clogged/Dirty air filters (43%)
- Electrical issues (breakers, connections): 22%
- Thermostat errors: 18%
- Refrigerant related problems: 12%
- Other mechanical failures: 5%
Seasonal failures also start to appear:
- Winner meltdowns in summer: Clogged systems in hot weather.
- Experienced issues on the initial autumn: Parsons and corrosion of the electric systems.
- Fall preparation oversights: Fall preparations systems do not easily do what they are supposed to do.
Being aware of such patterns can make your assistance in getting this to be the priority of the homeowner and a possible motivational factor to involve professionals.
Indications Your Air Conditioner Not Operating Properly
Moreover, the problems symptoms identified at the early stages will prevent complete system failure and costly repair due to an emergency. The major symptoms of a cooling issue are as follows:
Temperature-related symptoms:
- System is being cooled and hot air is escaping the vents.
- Temperature indoors is 5+ degrees low of their thermostats recommended frequency 30mins.
- Heat the rooms where there are more varying temperatures (differences of temperature more than 3 degrees).
- Intermittent operation of the system though constant temperature levels are not being achieved.
Airflow abnormalities:
- Agitated air currents via ducts.
- Other ones which are cool and others warm air blowers.
- Reduction in airflow than usual.
Performance Change that indicates a problem:
- Reduced rates of cooling (take 15 or more minutes to usual cooling time)
- Cycling (On off cycling) (short cycling)
- Increment in electricity prices with not additional consumption.
- Hypatosound (strange noises, grinding, banging, squeeling and so on).
- Leakage or any form of dampness that surrounds these indoor/ external units.
Causes of AC Cooling Failures
Based on experience in the field and past history of repair, the following are the most frequent causes that will cause the AC cooling to stop working:
Primary failure categories:
- Poor-air filter/air filter was dirty (28 percent of calls to service)
- Incorrect thermostat settings or deflated batteries (35 percent of service call-ins)
- Blocked or clogged outdoor condenser units (12 per cent. of service call)
- Fuses popped or melted (1/fifth service calls)
- Clogged condensate drain lines (8 percent of calls to service)
- Refrigerant leakage (use professional skills)
- Power outages or an error in sensors (need to be corrected by a professional)
The age trends of declines:
- Systems aged (8-12 years): reduction in wear, efficiency.
- Systems that are 12 years old and above: Refrigerant release, several systems fail simultaneously.
The figure below depicts statistics on maintenance neglect:
- Maintenance helps to avoid 73 percent of the emergency repair.
- With proper cleaning of filters, 28 percent of the cooling breakdowns will be eradicated.
- The seasonal cleaning consumes prevention of half a dozen of the open air unit problems.
When to DIY vs. Deciding When To Call When The AC Needs Emergency Repair
Safety Precautions Before DIY Troubleshooting
Stop and check-in with the following safety hazards:
Electrical dangers:
- Wires leaking or open around the AC devices.
- Electrical panels, or AC whatsoever, are burned with a smell.
- Soggy electrical contacts or wet space under equipment.
Refrigerant hazards:
- Hissing (refrigerant leak can have caused it to leak)
- Covering whole outdoor unit with ice.
- Pungent odour of chemicals on AC equipment.
Before any DIY work:
- The circuit breaker should never be left turned on.
- Put on gloves, safety goggles and heavy shoes.
- Do not open closed refrigeration containers.
- Always keep workspace clear and well-lit.
- Call a professional when doubtful.
Situations That Require Immediate Professional Help
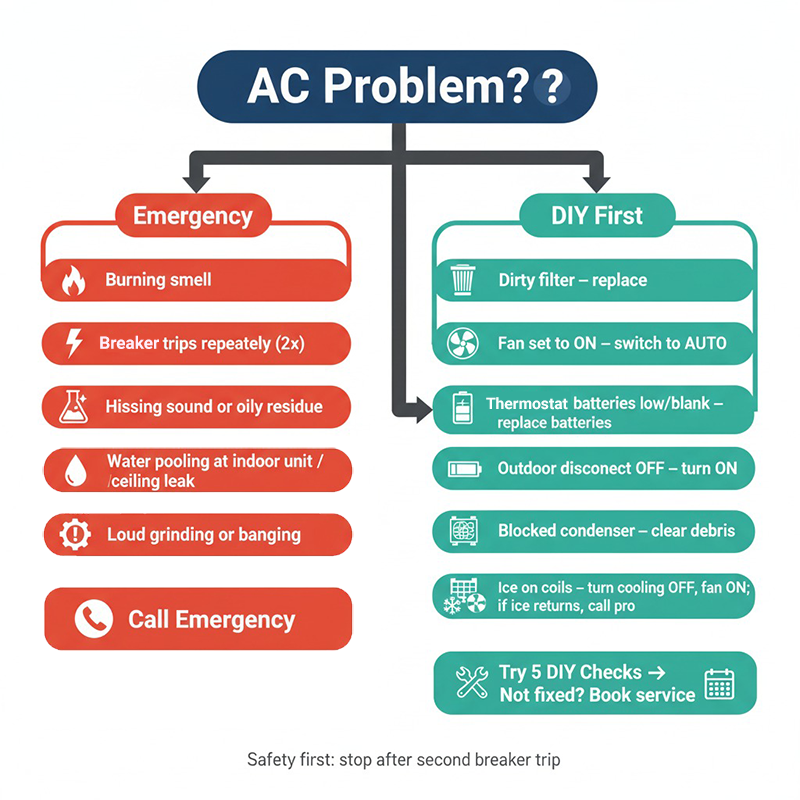
Contact Emergency service to fix the AC in case you can notice:
- Electrical burning or sparking smells.
- Refrigerant leakages (hissing noise, oily smear)
- Too much heat (90deg F and above outside) causes power outage.
- Abnormal loud sounds in the unit.
- Pus of water or longstanding water pitting.
- Repeated trips of circuit breakers.
DIY troubleshooting is economic given it is appropriate and safe, as the price of an emergency assistance adds the value of the normal repair with approximately, the 100 -250 dollars higher.
What Equipment You will Need to DIY with AC Troubleshooting
Basic Tools for AC Inspection
Essential homeowner toolkit (total cost: $50-100):
Safety equipment (required):
- Safety glasses with side shields
- Work gloves (non-conductive rubber or leather)
- Non-slip shoes with electrical hazard rating
- Flashlight or headlamp for inspection work
Basic diagnostic tools:
- Digital thermometer for temperature verification
- Smartphone timer for cycle timing
- Garden hose with adjustable nozzle for outdoor cleaning
- Screwdriver set (Phillips and flathead, various sizes)
- Wet/dry vacuum (for drain line cleaning)
Safety Equipment Recommendations
Personal protective equipment standards:
- Eye protection: ANSI Z87.1-rated safety glasses prevent debris injury
- Hand protection: Insulated work gloves rated for electrical work
- Respiratory protection: N95 masks when cleaning extremely dirty filters
Advanced DIY tools (optional):
- Non-contact voltage tester ($15-25) for electrical safety
- Digital multimeter ($30-50) for basic electrical troubleshooting
- Fin comb ($10-15) for straightening condenser coils
DIY Check #1: Check & Clean Your Air Filter
How to Locate Your AC Filter
The majority of the filters are found in one of the following places:
- Behind return air grilles (usually hallway or central living areas)
- Inside the air handler unit (basement, attic, or utility closet)
- In a dedicated filter housing between return ductwork and air handler
To locate your specific filter:
- Follow return air ducts from vents to air handler
- Look for removable panels or access doors
- Check your owner’s manual for exact location
- Look for arrows on existing filter indicating airflow direction
Step-by-Step Filter Cleaning or Replacement
Safety first: Turn off AC system at thermostat before filter maintenance
Inspection and replacement procedure:
- Remove filter by sliding out or lifting from housing
- Inspect condition: Hold filter up to light source – if you cannot see through clearly, replacement needed
- Check dimensions: Note filter size printed on frame (length x width x depth)
- Note MERV rating for proper replacement selection
- Insert new filter ensuring airflow arrows point in correct direction toward air handler
- Turn system back on and verify proper operation
Replacement timing guidelines:
- Standard 1-inch filters: Monthly during peak season (June-September)
- Pleated filters (2-4 inches): Every 2-3 months
- High-efficiency filters (4+ inches): Every 3-6 months
- Homes with pets: More frequent replacement needed
How Dirty Filters Impact Cooling Efficiency
Performance degradation data shows significant impacts:
A completely clogged filter can reduce airflow by up to 70%, forcing your system to work 40% harder while delivering 30% less cooling. Dirty filters are the #1 cause of weak cooling and can increase energy use by up to 15%.
Immediate effects of dirty filters:
- Indoor coil temperature drops, risking ice formation
- Blower motor works harder, increasing electrical consumption
- Reduced air circulation leads to uneven room temperatures
Long-term damage from neglected filters:
- Compressor overheating from restricted airflow
- Premature blower motor failure from overwork
- Ductwork pressure imbalances causing leaks
Cost implications: Dirty filters increase energy consumption by 15-25%, adding $200-400 annually to electric bills for average households.
DIY Check #2: Examine Your Thermostat Settings
Verifying Proper Thermostat Configuration
Critical settings verification checklist:
Essential mode settings:
- System switch: “COOL” (not “OFF” or “HEAT”)
- Fan setting: “AUTO” (not “ON” for continuous operation)
- Temperature setting: At least 5 degrees below current room temperature
The most common mistake: Fan set to “ON” causes 35% of “AC not cooling” service calls. When set to “ON,” your system circulates air continuously without cooling it. You feel air movement but no temperature drop.
Common configuration errors:
- Temperature differential too small (less than 3 degrees) prevents proper cycling
- Schedule settings overriding manual adjustments
- Battery-related display issues causing incorrect readings
Battery Replacement and Calibration Tips
Battery maintenance protocol for optimal performance:
Replacement indicators:
- Display dimming or flickering
- Unresponsive buttons or touchscreen
- System not responding to temperature changes
- “Low battery” warnings on display
Professional replacement procedure:
- Turn off system at thermostat
- Remove thermostat from wall mount (most models snap off)
- Replace batteries with fresh alkaline (usually AA or AAA)
- Reinstall and wait 2-3 minutes for complete system reboot
- Verify all settings return to previous configuration
Troubleshooting Smart Thermostat Connectivity Issues
Wi-Fi connectivity problems affect 40% of smart thermostat users, especially during summer when increased electrical device usage creates network interference.
Systematic troubleshooting approach:
Basic connectivity fixes:
- Restart the device and check for error codes
- Verify Wi-Fi connections and network strength at thermostat location
- Update firmware if available through device menu
Advanced connectivity solutions:
- Router restart: Unplug for 30 seconds, plug back in
- Reset thermostat Wi-Fi: Through device menu, reconnect with current credentials
- Network optimization: Create dedicated 2.4GHz network for smart home devices
- Signal improvement: Position Wi-Fi extender between router and thermostat
Interference troubleshooting:
- Check for microwave or baby monitor interference
- Test connection during different times (peak usage may cause issues)
- Ensure router is within 30 feet with minimal wall obstructions
DIY Check #3: Inspect the Outdoor Condenser Unit
Clearing Debris and Ensuring Proper Airflow
Outdoor unit maintenance requirements for optimal performance:
Essential clearance specifications:
- 18-24 inches clearance on all sides for proper airflow
- 5 feet minimum clearance above unit
- Level installation within 1/4 inch (use carpenter’s level to verify)
Safety protocol before cleaning:
- Turn off power at disconnect switch and thermostat
- Wait 30 minutes for electrical components to discharge
- Remove large debris by hand (leaves, sticks, trash)
- Clear vegetation within proper clearance zone
Cleaning the Condenser Fins
Professional cleaning technique:
Equipment needed:
- Garden hose with adjustable nozzle
- Fin comb for straightening bent fins
- Work gloves for protection
Step-by-step cleaning process:
- Remove protective grilles if accessible
- Spray coils gently with garden hose from inside-out to avoid bending fins
- Never use pressure washer – can damage delicate coil fins
- Straighten bent fins carefully with fin comb
- Replace protective grilles and restore power
Seasonal maintenance scheduling:
- Spring: Remove winter debris and vegetation growth
- Summer: Monthly inspection for grass clippings and seed pods
- Fall: Daily leaf removal during peak drop season
Listening for Unusual Noises
Sound diagnosis guide for homeowners:
Normal operation sounds:
- Gentle humming from outdoor compressor
- Soft whooshing from indoor blower
- Occasional clicking during startup/shutdown cycles
Warning sounds requiring immediate attention:
- Grinding or scraping: Bearing failure or loose components
- Banging or clanking: Damaged blower wheel or loose parts
- Squealing: Belt problems or motor bearing issues
- Repeated rapid clicking: Contactor issues
- Buzzing with electrical odor: Electrical failure (call professional immediately)
Action protocol: If you hear grinding, banging, or rattling, turn off the unit immediately and call a professional.
DIY Check #4: Check the Circuit Breaker and Power Supply
Locating and Resetting the Breaker
Electrical safety verification before any work:
- Turn off AC system at thermostat before checking electrical components
- Use non-contact voltage tester to verify power is off
- Never handle electrical components with wet hands
Main electrical panel inspection:
- Locate AC-labeled breakers (usually 30-60 amp double breakers)
- Check for tripped breakers in middle position (between ON/OFF)
- Reset if tripped: Turn fully OFF, wait 30 seconds, then switch to ON
- Look for warning signs: Burning odors or discoloration around breakers
Why This Matters: The Critical Power Connection
Circuit breaker issues cause 15% of cooling failures. A tripped breaker can stop your AC from running completely, even though you might still feel some air movement from the indoor blower motor.
The outdoor disconnect switch reality: 68% of “no cooling” calls involve overlooked disconnect switches located near the outdoor unit.
Disconnect switch inspection checklist:
- Location: Mounted on or within 3 feet of outdoor unit
- Appearance: Gray or metallic weatherproof box with pull-out handle or flip switch
- Function: May contain fuses or circuit breakers inside
- Verification: Ensure switch is in “ON” position and connections are secure
Important safety note: If a breaker trips repeatedly, this signals a deeper electrical issue requiring professional attention. Never keep resetting a repeatedly tripping breaker.
DIY Check #5: Inspect the Condensate Drain Line for Clogs
How to Locate the Drain Line
Understanding your condensate system: As your air conditioner pulls hot, humid air and cools it, moisture naturally forms on the cold evaporator coils. This water must drain away from your system to prevent damage.
Drain line location guide:
- Look for a PVC pipe near your indoor unit or air handler
- Typically runs from air handler to outside of your home
- Usually drains into yard or designated drainage area
- May have a visible access point with removable cap for cleaning
Step-by-Step Drain Line Cleaning
Safety first: A clogged drain line doesn’t necessarily warrant emergency AC repair, but it requires prompt attention to prevent water damage.
- Turn off the AC at thermostat and circuit breaker
- Check for standing water or visible clogs at drain opening
- Locate access points (usually near indoor unit)
- Flush with white vinegar: Pour 1 cup down the line to dissolve buildup
- Alternative method: Use wet/dry vacuum to suction clogs from outside drain opening
- Attach vacuum to drain end, wrap with cloth/tape for seal, and vacuum for 2-3 minutes
Why This Matters: The Hidden Danger of Drain Clogs
Condensate drain problems cause multiple system failures:
Immediate problems from clogged drains:
- Water backing up into drain pan and overflowing
- AC automatic shutoff when safety switch detects full drain pan
- High humidity levels as moisture re-enters your home air
- Ineffective cooling performance as system struggles with excess moisture
Long-term damage risks:
- Mold and mildew growth in dark, moist drain lines
- Corrosion of metal components from standing water
- Structural water damage if overflow reaches ceiling or walls
- Electrical hazards if water reaches system components
Recognition signs of drain line problems:
- Water pooling around indoor unit
- Musty odors from system vents
- AC shutting off unexpectedly (safety switch activation)
- Home feeling warm and muggy despite AC operation
Professional insight: One potential sign that your AC line is clogged – if your AC keeps losing power and then regaining it about 30-60 minutes later. This happens when the safety switch shuts down the system until water levels drop.
Cost-Benefit Analysis: DIY Fixes vs. Emergency AC Repair Services
Potential Savings from DIY Troubleshooting
Emergency service economics in 2025:
Standard emergency charges:
- Emergency diagnostic fee: $100-200
- After-hours service premium: $100-250 additional
- Weekend/holiday surcharge: $150-300 extra
- Total emergency service call: Often $300-600 before any actual repairs
DIY troubleshooting success rates and savings:
- Thermostat issues: 95% DIY success rate (saves $300-500)
- Filter problems: 100% homeowner resolution (saves $200-400)
- Basic electrical (breakers): 90% DIY success (saves $250-450)
- Outdoor unit cleaning: 85% effective when properly done (saves $200-350)
- Drain line clearing: 80% homeowner success rate (saves $300-500)
Annual savings potential: Simple DIY fixes like filter changes, thermostat checks, and drain cleaning can save $100-300 per incident. With preventive maintenance reducing emergency repairs by 73%, homeowners can avoid $400-800 annually in unnecessary emergency calls.
When Attempting DIY Repairs Can Cause More Damage
High-risk DIY activities that increase total costs:
Refrigerant system work (requires EPA certification):
- Improper refrigerant levels cause compressor damage ($1,200-2,500 repair)
- Environmental fines for refrigerant release: $10,000-37,500
- Safety hazards from refrigerant exposure
Advanced electrical work beyond basic breaker resets:
- Incorrect wiring can damage control boards ($300-600 replacement)
- Improper capacitor installation risks motor damage ($400-800 repair)
- Safety hazards from unqualified electrical work
Trial-and-error troubleshooting approach:
- Misdiagnosis leads to unnecessary part replacement
- Multiple amateur repair attempts often increase final costs
- Component damage from incorrect procedures
Understanding Warranty Implications
Critical warranty protection guidelines:
What DIY work is safe for warranties:
- Basic maintenance (filter changes, cleaning)
- Thermostat battery replacement
- Clearing debris from outdoor units
- Resetting circuit breakers
What voids manufacturer warranties:
- Unauthorized repairs beyond basic maintenance
- DIY attempts on sealed systems (refrigerant, electrical components)
- Amateur electrical work on system components
- Any modification to factory-installed components
Warranty reality check: Most AC warranties require that repairs be performed by licensed HVAC professionals. DIY repairs beyond basic maintenance can void your warranty, leaving you responsible for all future costs. Always check warranty terms before attempting any repair work.
What to Expect When You Need Emergency AC Repair
How to Communicate Problems Effectively to Technicians
Essential information for efficient service calls:
System details to gather:
- AC age and manufacturer (check outdoor unit label)
- Approximate system size in tons (from installation paperwork)
- Recent maintenance history and any previous repairs
- Warranty status and coverage information
Problem description specifics:
- When problem started (exact time/date if possible)
- Specific symptoms (no cooling, partial cooling, strange noises)
- What you’ve already attempted (from this guide’s five checks)
- Environmental factors (power outages, recent weather events, unusual circumstances)
Preparation for technician arrival:
- Clear access path to indoor and outdoor units
- Locate and label electrical panels and disconnect switches
- Gather warranty information and recent service records
- Prepare list of questions about system maintenance and future prevention
Typical Emergency Repair Procedures
Standard emergency service protocol:
Initial assessment phase (15-30 minutes):
- System performance evaluation and temperature measurements
- Electrical testing of major components (contactors, capacitors, motors)
- Visual inspection of indoor and outdoor units
- Diagnostic computer testing for newer systems
Common emergency repairs with realistic timeframes:
- Capacitor replacement: 30-45 minutes ($150-400 total cost)
- Contactor replacement: 45-60 minutes ($200-500 total cost)
- Condensate drain clearing: 30-60 minutes ($200-400 total cost)
- Refrigerant leak detection/repair: 2-4 hours ($400-1,500 total cost)
- Compressor replacement: 4-8 hours ($1,500-3,000+ total cost)
Average Costs and Payment Options
2025 emergency repair pricing breakdown:
Service call structure:
- Diagnostic fee: $100-200 (usually applied to repair cost if work is approved)
- Emergency surcharge: $100-250 (nights, weekends, holidays)
- Labor rates: $80-150 per hour depending on region and company
- Parts markup: Typically 20-50% above wholesale cost
Financing and payment options:
- 0% APR financing for 6-24 months (common for repairs over $500)
- Credit card acceptance (most companies, sometimes with processing fees)
- Emergency payment plans for major repairs over $1,000
- Warranty coverage verification before any payment processing
Cost expectation by repair type:
- Minor issues (thermostat, breaker, drain): $200-500
- Component replacement (motors, capacitors): $400-900
- Major repairs (refrigerant, compressor): $1,000-2,500+
Preventative Maintenance to Avoid Future AC Emergencies
Seasonal Maintenance Checklist
Spring preparation (March-April):
- Replace air filters and inspect filter housing for damage
- Clear outdoor unit of winter debris and trim vegetation growth
- Test thermostat operation through full cooling cycle
- Check electrical connections at disconnect switch
- Schedule professional tune-up for peak season preparation
Summer monitoring (May-September):
- Monthly filter inspection and replacement as needed
- Weekly outdoor unit visual inspection for debris accumulation
- Monitor energy bills for unusual increases (15%+ may indicate problems)
- Listen for changes in system operation sounds during cycles
- Maintain proper clearance (18+ inches) around outdoor equipment
Fall maintenance (October-November):
- Final filter replacement before reduced usage season
- Thorough cleaning of outdoor unit before winter
- Trim vegetation for winter dormancy around equipment
- Check visible ductwork in basement/crawl spaces for issues
- Review system performance for next season planning
Benefits of Professional Maintenance Plans
Annual maintenance plan value proposition:
Cost-benefit analysis:
- Single tune-up cost: $120-350 per visit
- Annual maintenance plan: $150-300 per year (typically includes 2 visits)
- Average savings: $90-200 annually plus valuable priority service benefits
Typical maintenance plan benefits:
- Spring and fall comprehensive system inspections
- Priority scheduling for repairs during peak seasons
- Discounted repair rates (typically 10-15% off standard pricing)
- Extended warranty protection beyond manufacturer terms
- 24/7 emergency service access at reduced rates
Proven maintenance effectiveness statistics:
- Reduces emergency repairs by 73%
- Extends system lifespan by 5-8 years on average
- Improves energy efficiency by 15-20%
- Maintains warranty compliance with manufacturer requirements
Early Warning Signs of AC Failures
Subtle performance indicators homeowners often overlook:
Gradual performance decline patterns:
- Cooling time increases (5+ minutes longer than previous year to reach set temperature)
- Rising energy bills without usage changes (15%+ increase may indicate inefficiency)
- Cycle frequency changes (more frequent on/off or longer continuous run times)
- Temperature inconsistency between rooms (3+ degree variations throughout home)
Physical system warning signs:
- Unusual dust accumulation around supply vents
- Moisture or water stains near indoor unit or ductwork
- Rust or corrosion visible on outdoor unit components
- Vegetation changes near outdoor unit (dead plants may indicate refrigerant leaks)
Proactive monitoring schedule for homeowners:
- Monthly: Visual inspection, filter condition check, basic performance assessment
- Quarterly: Temperature verification, timing of cooling cycles, energy bill review
- Seasonally: Professional assessment of overall system condition and efficiency
- Annually: Comprehensive maintenance and efficiency testing by certified technician
Conclusion: Staying Cool When Your AC Isn’t
A non-cooling AC doesn’t always require expensive emergency repair. By following these five proven DIY checks, you can resolve 88% of common cooling issues yourself, potentially saving $250-500 per avoided emergency service call.
Your 30-minute AC revival plan summary:
- Thermostat verification (5 minutes) – Fixes 35% of problems
- Air filter inspection (10 minutes) – Solves 28% of issues
- Power supply check (5 minutes) – Resolves 15% of failures
- Outdoor unit cleaning (8 minutes) – Addresses 12% of problems
- Condensate drain inspection (2 minutes) – Identifies 8% of issues
Key prevention statistics:
- Regular maintenance prevents 80% of all HVAC repairs
- Monthly filter changes prevent 28% of cooling failures
- Annual professional service reduces emergency repairs by 73%
- Proper maintenance extends system lifespan by 5-8 years
Remember the safety boundaries: While DIY troubleshooting saves money and provides immediate relief, refrigerant issues, major electrical problems, and component failures require professional expertise. The investment in licensed service becomes worthwhile when safety risks emerge or when repair costs exceed 50% of system replacement value.
Professional consultation is recommended when:
- Multiple DIY checks fail to restore proper cooling
- System age exceeds 12 years with frequent recurring problems
- Energy bills continue rising despite consistent maintenance efforts
- Any safety concerns arise during troubleshooting procedures
Master these five fundamental checks and you’ll join the ranks of homeowners who rarely need emergency HVAC service, while maintaining the safety and efficiency of your cooling system year-round.
FAQs: High-Demand Questions from USA Homeowners
Why does my AC run all day but never reach the set temperature?
Your system may be undersized for your home’s cooling needs. This affects millions of American homes where undersized AC units struggle to cool effectively, running continuously without reaching desired temperatures. Other causes include ductwork leaks, poor insulation, or extreme outdoor heat overwhelming system capacity. If your AC runs constantly during moderate weather (80-85°F outside), it’s likely undersized and needs professional evaluation.
Is it safe to close vents in unused rooms to save energy?
No, closing vents actually increases energy costs and can damage your system. Contrary to popular belief, closing vents doesn’t save energy and can actually increase utility bills by making your HVAC system work harder. Your system is designed for balanced airflow throughout your home. Closing vents increases duct pressure, forces air through leaks, reduces efficiency, and can damage components. Keep all vents open for optimal performance.
Why does my AC smell musty when it starts?
Mold or mildew growth in coils or drain lines causes musty odors. This is especially common in high-humidity climates or homes with poor ventilation. Clean the condensate drain line with white vinegar, ensure proper drainage, and consider professional duct cleaning. UV lights installed in ductwork help prevent future microbial growth.
Can pets or dust really impact my AC’s performance?
Yes, significantly. Pet hair and excessive dust clog filters and coils, reducing airflow and efficiency by up to 25%. Homes with pets should change filters more frequently – sometimes monthly instead of quarterly. Pet dander also accumulates on coils, requiring more frequent professional cleaning.
How often should I schedule professional maintenance if my AC seems fine?
At least once annually, preferably twice (spring and fall). Preventative maintenance catches small issues before they become emergencies and reduces breakdown probability by 73%. Even well-performing systems benefit from professional inspection, cleaning, and adjustment to maintain efficiency and warranty compliance.
Can I use my AC during wildfire smoke or high pollen days?
Yes, but take precautions. Set your system to “recirculate” mode, use high-quality MERV 11-13 filters, and keep windows/doors closed. Consider upgrading to HEPA filtration for maximum protection during severe air quality events. Change filters more frequently during these periods.
Will DIY repairs void my AC warranty?
Basic maintenance like filter changes won’t void warranties, but anything beyond simple maintenance can. Most manufacturers require licensed professional service for repairs to maintain warranty coverage. Always check your specific warranty terms before attempting any repair work beyond the five checks outlined in this guide.
How long should I wait after turning off my AC before checking electrical components?
Wait minimum 30 minutes after turning off power before accessing electrical components. Capacitors can store dangerous electrical charges for 20-45 minutes after shutdown. Always use a non-contact voltage tester to verify components are safe to handle before touching any electrical parts.
Why does my outdoor unit have water around it – is this normal?
Minimal condensation is normal during humid conditions, but excessive water pooling indicates problems. Check that the condensate drain isn’t clogged and the outdoor unit sits level. Standing water exceeding 1-2 cups requires professional evaluation as it may indicate refrigerant leaks, drainage issues, or indoor coil problems.