Reading Time: 12 minutes
Difficulty Level: Moderate (DIY-friendly with safety precautions)
Estimated Time: 45-60 minutes
Denver Altitude Considerations: Included
This guide is based on professional experience with nearly hundreds of Carrier 58MSA060 installations along Colorado’s Front Range. All of the steps are in line with ASHRAE standards and Carrier manufacturer specifications.
READ THIS LEGAL WARNING AND SAFETY WARNING BEFORE CONTINUING:
The only reason this guide exists is to teach you something. There are serious risks involved in working on gas furnace systems, such as:
- Electric shock from circuits with 120 to 240 volts
- Risk of fire and exposure to natural gas
- Carbon monoxide poisoning due to bad service
- Damage to property caused by wrong procedures
- Manufacturer warranty voidance
EmergencyHVACs.com is NOT responsible for any injuries, damage to property, warranty problems, or code violations that happen as a result of following this guide.
You take on all the risks by continuing. We strongly suggest:
✓ Checking the status of your manufacturer’s warranty before doing any work yourself
✓ Making sure you follow Colorado and local building codes (some places need licensed contractors)
✓ Keeping homeowner’s insurance that covers repairs you do yourself
✓ If you’re not sure about any part of the process, call a licensed HVAC professional.
Before You Begin: Safety & Tools
Required Tools
| Tool | Purpose | Approximate Cost |
|---|---|---|
| Phillips #2 screwdriver | Cabinet access panels | $8-15 |
| Digital multimeter | Voltage/continuity testing | $20-40 |
| Fine steel wool (#0000) | Flame sensor cleaning | $5-8 |
| Shop vacuum with brush attachment | Debris removal | $40-80 (if not owned) |
| Flashlight or headlamp | Interior inspection | $10-25 |
| Needle-nose pliers | Pressure switch hose removal | $8-15 |
| Safety glasses | Eye protection | $5-10 |
| Work gloves (non-conductive) | Hand protection | $8-12 |
Total Tool Investment (if starting from scratch): $104-205
Professional Service Call Alternative: $150-250
Required Parts
| Part | OEM Part Number | Cost | Where to Buy |
|---|---|---|---|
| Furnace Filter (MERV 13, 25x20x5) | Carrier CNPHPTR3625 or equivalent | $35-55 | Home Depot, Lowe’s, Amazon |
| 80/20 Isopropyl Alcohol | N/A | $4-6 | Any hardware store |
| Microfiber cleaning cloths | N/A | $5-10 | Any hardware store |
Optional Replacement Parts (only if damaged during inspection):
- Flame sensor rod: Carrier 117498-05 ($15-30)
- Pressure switch hose: Generic 3/16″ rubber tubing ($5-10)
Understanding Your Carrier 58MSA060-08 Furnace
System Specifications
Model: Carrier 58MSA060-08
Type: 4-way multipoise, single-stage, condensing gas furnace
BTU Input: 60,000 BTU/h
AFUE Rating: 80% (80% efficiency)
Filter Size: 25″ x 20″ x 5″ (pleated media filter)
Common Applications: 1,200-1,800 sq ft homes in Denver climate zone
Why This Maintenance Is Important
Many homes in the Denver area built between 2000 and 2015 have the Carrier 58MSA060 furnace. Dirty filters can make your HVAC system less efficient by 15 to 20%, which means you’ll pay an extra $50 to $100 a year for heating. They also make your blower motor work harder, which speeds up wear.
These three parts (we’ll service today) will stop 80% of winter service calls related to emergency furnace repair in Denver:
- Replacing the filter restores airflow and makes the air inside better.
- Cleaning the flame sensor – Fixes ignition failures that cause “short cycling”
- Pressure switch verification makes sure that the venting of combustion gas is safe.
Considering the altitude of Denver: At 5,280 feet, furnaces need fuel-air mixtures that are a little less rich. For proper combustion at high altitudes, it is very important to keep the filters clean.
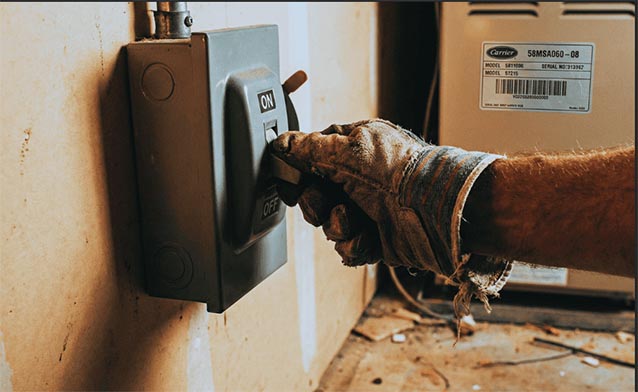
Step 1: Safety First – Power Down & Visual Inspection
Procedure
- Find the switch that turns off your furnace. It is usually a red or gray switch on the wall near the unit or a breaker in your electrical panel labeled “FURNACE”
- Turn OFF the disconnect switch or breaker
- Find the gas shutoff valve, which is usually a yellow or red lever-handle valve on the gas line that goes into the furnace. To close, turn the pipe at a right angle (for safety during inspection work)
- If the furnace was just on, wait 30 minutes. This lets the heat that is still there go away and keeps you from getting burned.
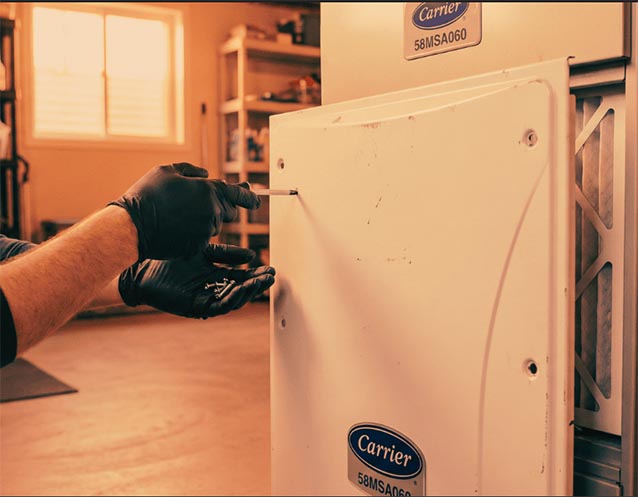
- Using a Phillips screwdriver, take off the front access panel. There are usually 4 to 6 screws around the edge.
- Look for these warning signs:
If you see any of the following, STOP and call a professional right away:
❌ Soot on burners (means that the combustion wasn’t complete)
❌ Cracks or rust on the heat exchanger (risk of carbon monoxide)
❌ Water stains or puddles (the condensate drain isn’t working)
❌ Burn marks on wires (dangerous for electrical work)
❌ Strong smell of gas (gas leak)
Safe to proceed if you see:
✓ Clean burner assembly with minor dust
✓ Intact wiring with no exposed conductors
✓ Dry cabinet interior
✓ No unusual odors
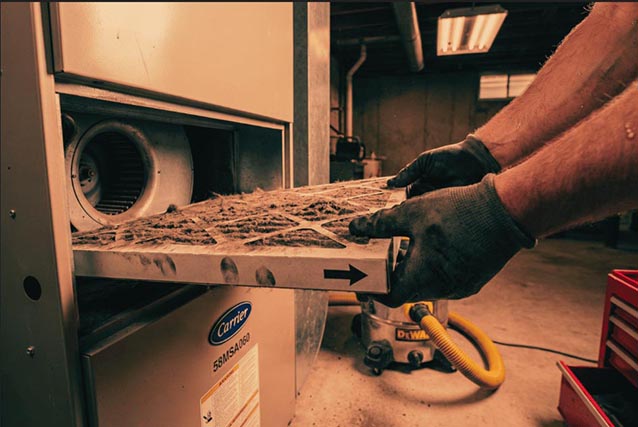
Step 2: Replace Furnace Filter
Why Filter Quality Matters
Not all filters are equal. The Carrier 58MSA060-08 is designed for MERV 11-13 pleated filters.
| Filter Type | MERV Rating | Pros | Cons | Recommendation |
|---|---|---|---|---|
| Fiberglass flat panel | MERV 2-4 | Cheap ($3-5), high airflow | Filters almost nothing | ❌ Avoid |
| Pleated disposable | MERV 8-11 | Good particle capture | Replace every 2-3 months | ⚠️ Acceptable |
| High-efficiency pleated | MERV 13 | Excellent IAQ, 3-month lifespan | Higher cost ($35-55) | ✅ Recommended |
| HEPA | MERV 17-20 | Hospital-grade filtration | Restricts airflow, voids warranty | ❌ Requires system modification |
Note about the air quality in Denver: The MERV 13 filters are a good investment for your respiratory health because of the wildfires and dust storms that happen in the Front Range in the spring.
Procedure
- Find the filter slot. On the 58MSA060, it’s usually on the return air side (the bottom or side of the cabinet) before the blower.
- Before you take out your old filter, look for the arrow that shows the direction of the airflow (it should point toward the blower or furnace).
- Take out the old filter – Pull straight out while holding the bottom to keep the dust from spilling.
- Check how much debris has built up:
- Normal to have light dust after three months
- After one month, if you see a cake of dust or pet hair, you should upgrade to MERV 13 or look for leaks in the return air.
- If there’s no dust, the filter is in the wrong way (check the airflow arrow again).
- Use a shop vacuum with a brush attachment to clean the filter slot and the area around the cabinet.
- Check the blower wheel for too much dust buildup (you can see it through the filter slot)
- Light dust is normal
- Professional cleaning is recommended if there is thick cake on the blower blades because it lowers efficiency by 20–30%.
- Put in a new MERV 13 filter:
- Check that the airflow arrow points to the inside of the blower or furnace.
- Make sure the filter sits all the way in the track with no gaps around the edges.
- Gaps let unfiltered air get through (dirty evaporator coil over time)
- Write down the date – For tracking, use a permanent marker to write the installation date on the edge of the filter frame.
Step 3: Clean Flame Sensor
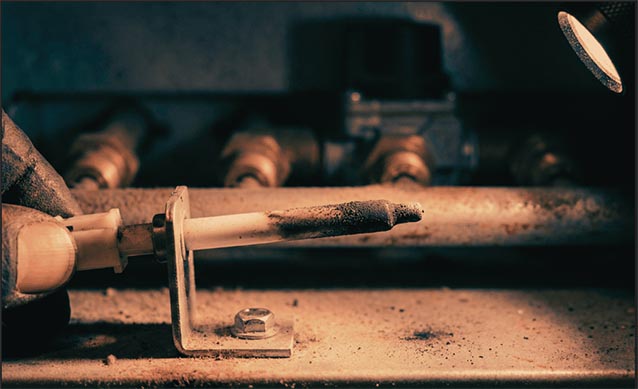
What the Flame Sensor Does
The flame sensor is a metal rod with a porcelain tip that sits in the path of your burner flame. It works by rectifying the flame. When it is working correctly, it sends 4 to 6 microamps of current to the control board, which tells it that there is a flame.
When it breaks down (which happens in 80% of “furnace won’t stay lit” service calls):
- The furnace lights up, then goes out after 3 to 5 seconds.
- Trying to start the engine over and over (short cycling)
- No heat even though the thermostat is calling
Cause: The buildup of carbon and soot lowers electrical conductivity below 0.5 microamps, which causes a safety shutdown.
Procedure
- Find the flame sensor: it’s a white or porcelain-tipped rod about 4 to 5 inches long that is connected by a wire harness inside the burner compartment.
- Disconnect the wire harness – Gently pull the connector straight off (don’t pull on the wires).
- Take out the mounting screw. Usually, there is one 1/4″ hex head or Phillips screw holding the bracket in place.
- Initial cleaning:
- Fold the microfiber cloth and wet it with 80/20 isopropyl alcohol.
- Wipe the porcelain or metal rod from the base to the tip.
- Don’t use water because it leaves behind mineral deposits that make it less conductive.
- Check out the sensor rod:
- Light discoloration is normal; keep polishing.
- Black soot crust means a lot of buildup, so you need to polish it with steel wool.
- If there are pits, cracks, or warping, you need to replace it (Carrier 117498-05, $15–30).
- If there is still soot, polish with steel wool:
- Use #0000, which is the best grade. Only steel wool – coarser grades scratching porcelain
- Very light pressure, straight longitudinal strokes (not circular)
- Focus on the probe tip where flame contact occurs
- After polishing, wipe with a cloth that has been dampened with alcohol.
- Put the sensor back in:
- Put the rod back in its original place, which is about 1/2 inch from the burner ports.
- Tighten the mounting screw (not too much, just enough)
- Reconnect wire harness until click
Denver Altitude Note
Burners run a little leaner (less gas, more air) at 5,280 feet. Flame sensors can build up residue more quickly when the air is drier. Cleaning should be done every 12 months (as opposed to every 18 to 24 months at sea level).
Step 4: Test Pressure Switch
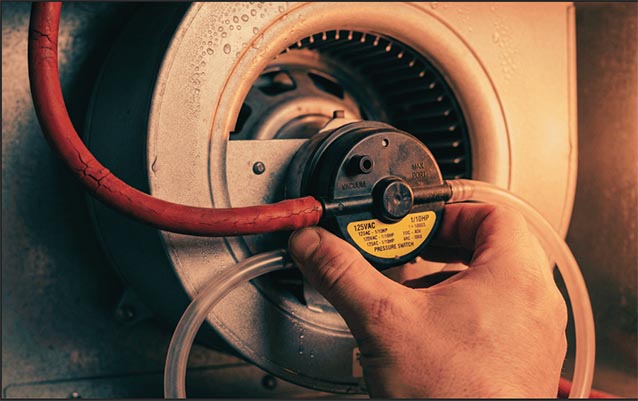
What the Pressure Switch Does
The pressure switch is a safety feature that makes sure the draft inducer motor in your furnace is safely moving combustion gases through the heat exchanger and outside.
How it works:
- Draft inducer starts, creating negative pressure (vacuum) in collector box
- Vacuum pulls rubber hose connected to pressure switch diaphragm
- The switch closes the circuit when the water column (W.C.) pressure is between -0.4 and -0.6 inches.
- Control board receives “safe to ignite” signal
- Gas valve opens and ignition occurs
When it doesn’t work:
- The furnace runs the inducer but never lights up.
- The LED error code flashes (this depends on the control board).
- No heat even though the thermostat says so
Reasons: Clogged hose (80%), failed switch diaphragm (15%), collector box obstruction (5%)
Procedure
- Locate pressure switch – Mounted on top or side of draft inducer housing, circular black component with two rubber hoses attached
- Identify the hoses:
- One hose connects to collector box (push-fit or barbed connection)
- One hose connects to furnace cabinet vent or open air (reference pressure)
- Disconnect collector box hose:
- Push-fit: Press collar and pull hose straight out
- Barbed: Use needle-nose pliers to gently work hose off fitting
- Inspect hose for blockages:
- Hold up to light – should be able to see through clear/translucent hose
- Blow gently through hose – should pass air freely
- If blocked: Soak in warm soapy water, clear with pipe cleaner, or replace ($5-10)
- Blow test on pressure switch (optional diagnostic):
- With collector hose disconnected, blow gently into switch port
- Listen/feel for audible “click” (diaphragm engaging)
- No click = failed switch (replacement required, $35-60)
- Multimeter continuity test:
- Set multimeter to continuity (Ω symbol with sound waves)
- Touch probes to switch terminal screws
- Without blowing: Open circuit (OL or infinite resistance)
- While blowing: Closed circuit (0Ω and audible beep)
- If the switch doesn’t change states: Failed, needs to be replaced
- Reattach hoses tightly to make sure there are no air leaks (which would weaken the vacuum signal).
When to Get Help from a Pro
If you see this, STOP and call a professional:
- The pressure switch shows continuity even when there is no vacuum (stuck closed = dangerous)
- Reading the vacuum below -0.3″ W.C. (needs a manometer tool and a professional to figure out what’s wrong)
- The inducer motor makes strange noises, like grinding or squealing.
- The vent pipe is broken or not connected.
Step 5: Putting it all back together & Power-Up Test
- Check again visually before closing:
- All wire harnesses reconnected
- No tools left inside cabinet
- No loose screws in blower compartment
- Filter properly seated with airflow arrow correct
- Reinstall access panel:
- Align panel with screw holes
- Hand-tighten all screws first
- Then snug with screwdriver (do not over-torque – stripped sheet metal threads are common DIY error)
- Restore gas supply:
- Turn gas shutoff valve handle parallel to pipe (open position)
- Sniff near valve for gas odor – if detected, close valve and call professional immediately
- Restore electrical power:
- Turn ON furnace disconnect switch or breaker
- Set thermostat for test cycle:
- Increase temperature setting 5°F above current room temp
- Set to “Heat” mode (not “Auto”)
- Fan setting: “Auto” (not “On”)
- Monitor 10-minute test cycle:
Normal operation sequence (0-2 minutes):
- Draft inducer motor starts (audible hum from furnace)
- 30-90 second pre-purge cycle
- Igniter glows orange (visible through observation window if equipped)
- Audible click of gas valve opening
- Flame ignites across burners (blue flame, no yellow/orange)
Normal operation (2-10 minutes):
- Blower motor starts after 30-90 second heat rise delay
- Warm air flowing from registers
- Steady flame (no flickering or lifting off burners)
- Quiet inducer operation (no grinding or squealing)
- Check for error codes:
- Observe control board LED
- Steady green = normal operation
- Flashing patterns = error code (consult user manual)
- Verify proper shutdown:
- Lower thermostat below room temp
- Gas valve closes (flame extinguishes)
- Blower continues 60-180 seconds (cool-down cycle)
- All components stop
Success Indicators
✅ Signs of Success If your maintenance worked:
- Ignition occurs on first attempt (no retries)
- Flame is steady blue (not yellow/orange with soot)
- No unusual odors (burning dust for first minute is normal)
- Blower runs quietly
- No error codes flashing
Recommended Maintenance Schedule
DIY Maintenance (You Can Handle)
| Task | Frequency | Time Required | Difficulty |
|---|---|---|---|
| Filter replacement | Every 3 months (monthly during wildfire season) | 5 minutes | ⭐ Easy |
| Flame sensor cleaning | Every 12 months | 20 minutes | ⭐⭐ Moderate |
| Pressure switch inspection | Every 12 months | 15 minutes | ⭐⭐ Moderate |
| Visual safety inspection | Every 6 months | 10 minutes | ⭐ Easy |
| Thermostat battery replacement | Annually (if battery-powered) | 5 minutes | ⭐ Easy |
Professional Maintenance (Call EmergencyHVACs Network Professionals)
| Service | Frequency | Why Professional Required |
|---|---|---|
| Complete combustion analysis | Every 2 years | Requires digital combustion analyzer |
| Blower motor deep cleaning | Every 3-5 years | Requires disassembly and balancing |
| Heat exchanger inspection | Every 2 years | CO safety risk, needs borescope |
| Gas pressure testing | Every 2 years | Requires manometer, safety training |
| Full system tune-up | Every 1-2 years | Multi-point inspection, efficiency optimization |
| Ductwork inspection | Every 5 years | Identifies leaks reducing efficiency 20-30% |
Seasonal Checklist
October (Pre-Heating Season):
✓ Replace filter with fresh MERV 13
✓ Clean flame sensor
✓ Test pressure switch
✓ Verify thermostat battery
✓ Clear debris from outdoor vent terminal
✓ Schedule professional tune-up if >2 years since last service
April (Post-Heating Season):
✓ Replace filter
✓ Visual inspection for off-season wear
✓ Turn off humidifier (if equipped)
Conclusion: Regular Maintenance can help your Furnace last longer
In Denver’s climate, these three easy tasks: changing the filter, cleaning the flame sensor, and checking the pressure switch, stop 80% of winter emergency service calls. You can do the following by spending 60 minutes a year:
✅ Save $330–490 a year on professional service calls
✅ Increase the life of your furnace by 40% (from 15 years to 20+ years)
✅ Lower your heating bills by 15–20% by keeping it efficient
✅ Make the air inside your home cleaner with MERV 13 filtration
✅ Avoid heating emergencies at midnight during the January cold snaps
Your Carrier 58MSA060-08 is a long-lasting furnace that can provide decades of comfort for your Denver home with the right maintenance.